
Ordering custom apparel online can feel overwhelming if you have never done it before. At Little 6 Industries, we make it simple to create custom t-shirts, hoodies, polos, and more with your logo, design, or message. This guide walks you through the entire process step-by-step, from choosing your product to placing your order.
Whether you are ordering team shirts, business uniforms, event apparel, or promotional products, follow this easy guide to get exactly what you need. Moreover, if you get stuck at any point, we are just a phone call away at (520) 705-4026!
⬆️ Watch the video tutorial or read the step-by-step guide below!
👕 HOW TO ORDER CUSTOM APPAREL
Simple Steps to Create Custom T-Shirts, Hoodies & More
STEP 1: BROWSE OUR PRODUCT CATALOG
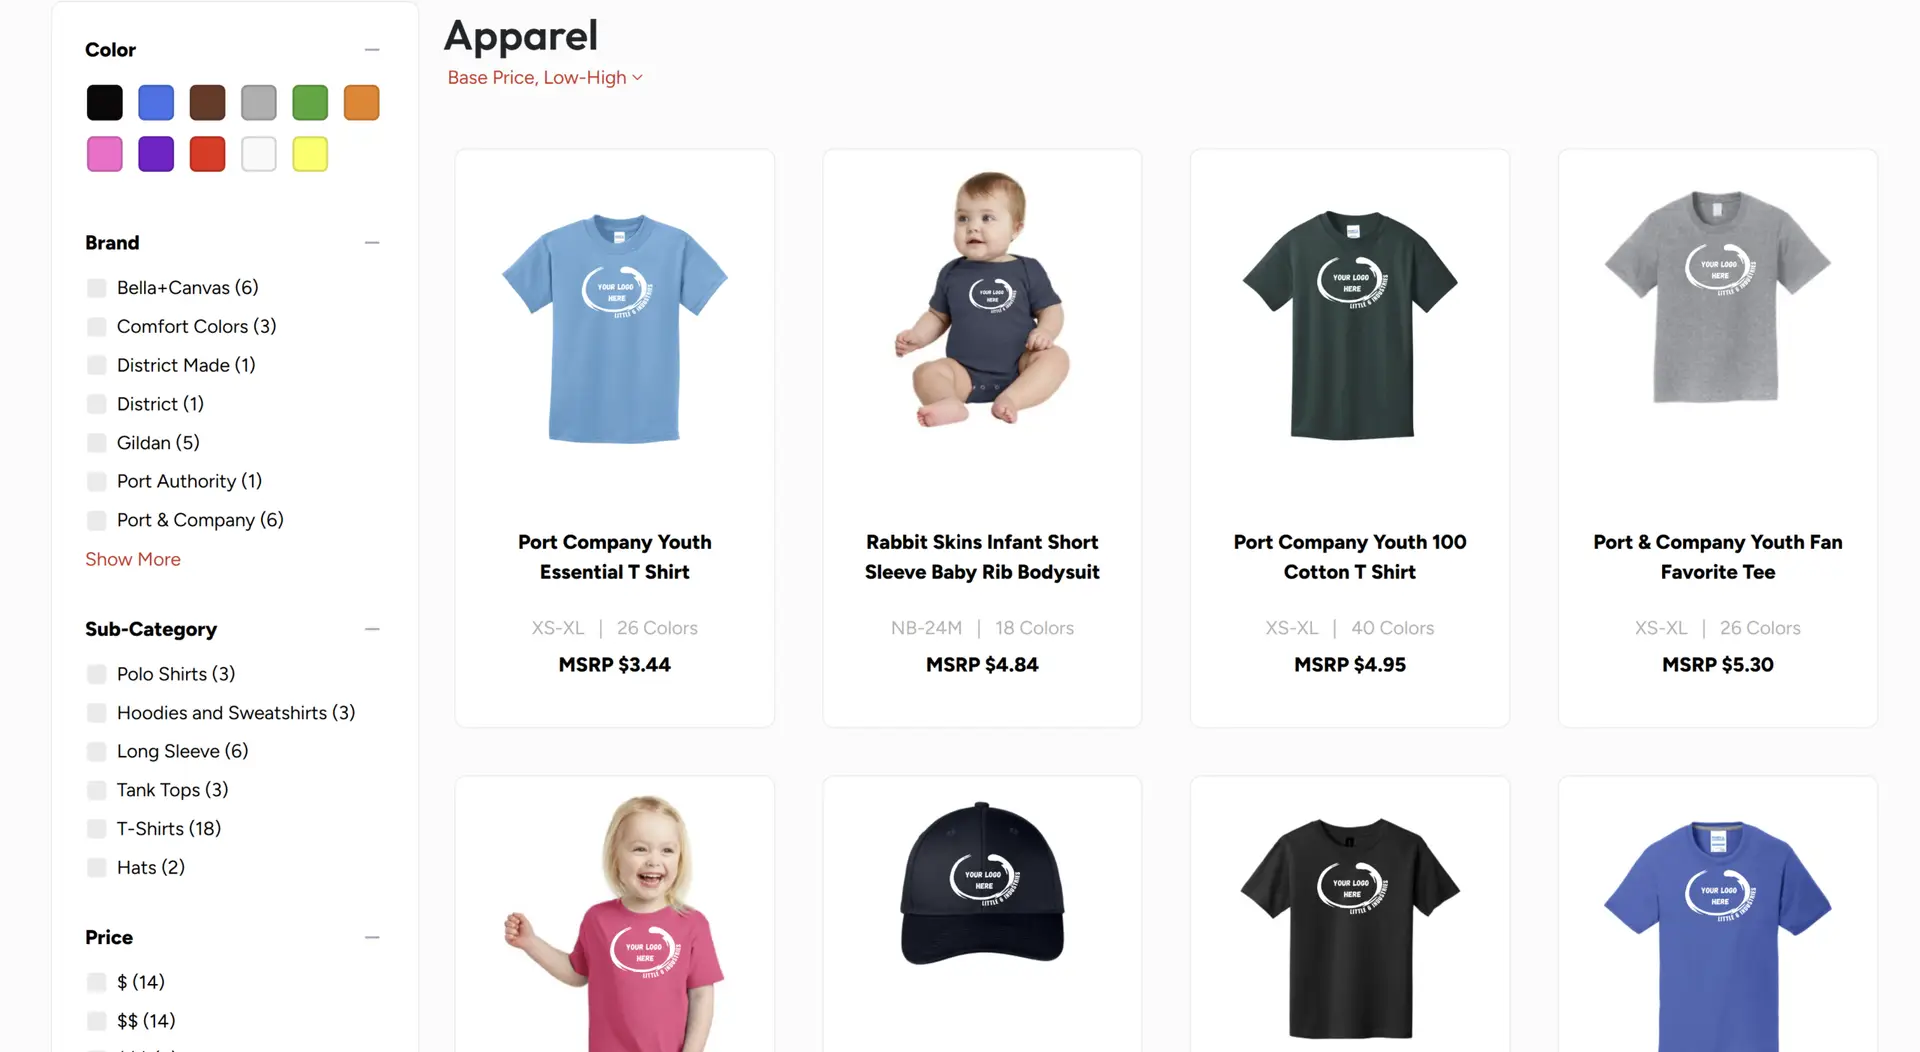
First, visit little6llc.com and click on “Products” in the main menu. Then, select “Apparel” to see all available clothing options.
You will see categories including:
• T-Shirts (short sleeve, long sleeve, performance)
• Hoodies & Sweatshirts
• Polo Shirts
• Tank Tops
• Hats & Caps
• Long Sleeve Shirts
• Jackets
💡 PRO TIP: Not sure which shirt style to choose? Popular options include Bella Canvas (soft, retail quality), Gildan Softstyle (budget-friendly comfort), and Sport-Tek (athletic performance). Additionally, we can help you choose the right style for your needs—just call us!
STEP 2: SELECT YOUR PRODUCT
Once you find a category you like (T-Shirts, Hoodies, Polos, etc.), click on it to see all available products.
🔍 USE THE SEARCH AND FILTER TOOLS:
On the left side of the screen, you will see helpful filters to narrow down your choices:
Color: Click on color swatches to see only products available in that color (black, blue, brown, gray, green, orange, pink, purple, red, white, yellow, and more)
Brand: Filter by popular brands like:
• Bella+Canvas (soft, retail quality)
• Gildan (budget-friendly, reliable)
• Sport-Tek (athletic performance)
• Port & Company (versatile basics)
• Comfort Colors (vintage, pigment-dyed)
• Rabbit Skins (youth and toddler sizes)
Price: Filter by budget ($ for economy, $$ for premium)
Size: Filter to show only products available in specific sizes (XS, S, M, L, XL, 2XL, 3XL, 4XL, 5XL)
Click the checkboxes next to any filter to apply it. The product list will update automatically to show only items matching your selections!
💡 FILTER TIP: Not sure which brand to choose? Here are our most popular recommendations:
• Bella+Canvas: Softest feel, retail quality, modern fit – great for events and gifts
• Gildan Softstyle: Budget-friendly with good comfort – perfect for teams and bulk orders
• Sport-Tek: Moisture-wicking, athletic fit – ideal for sports teams and active wear
Still unsure? Call us at (520) 705-4026 and we will help you choose the perfect shirt for your needs!
When you find a product you like, click on it to see the full details page. On this page, you will see:
Product Photos: Multiple angles and color options
Available Colors: Click different color swatches to preview
Available Sizes: From Youth XS to Adult 5XL (depending on the product)
Pricing: Base garment price (printing cost is added in the next step)
Product Description: Material, fit, features, and care instructions
📏 SIZING TIP: Most apparel runs true to size, but if you are unsure, we recommend ordering one size up for a looser fit or to accommodate shrinkage. Furthermore, size charts are available on each product page—scroll down to see measurements!
STEP 3: CHOOSE YOUR WORKFLOW – TWO OPTIONS!
On the product page, you will see TWO red buttons:
🎨 “Create Design” (left button) – Use the online designer to build your design from scratch
📤 “Upload Design” (right button) – Upload your own artwork file
Which button should you click?
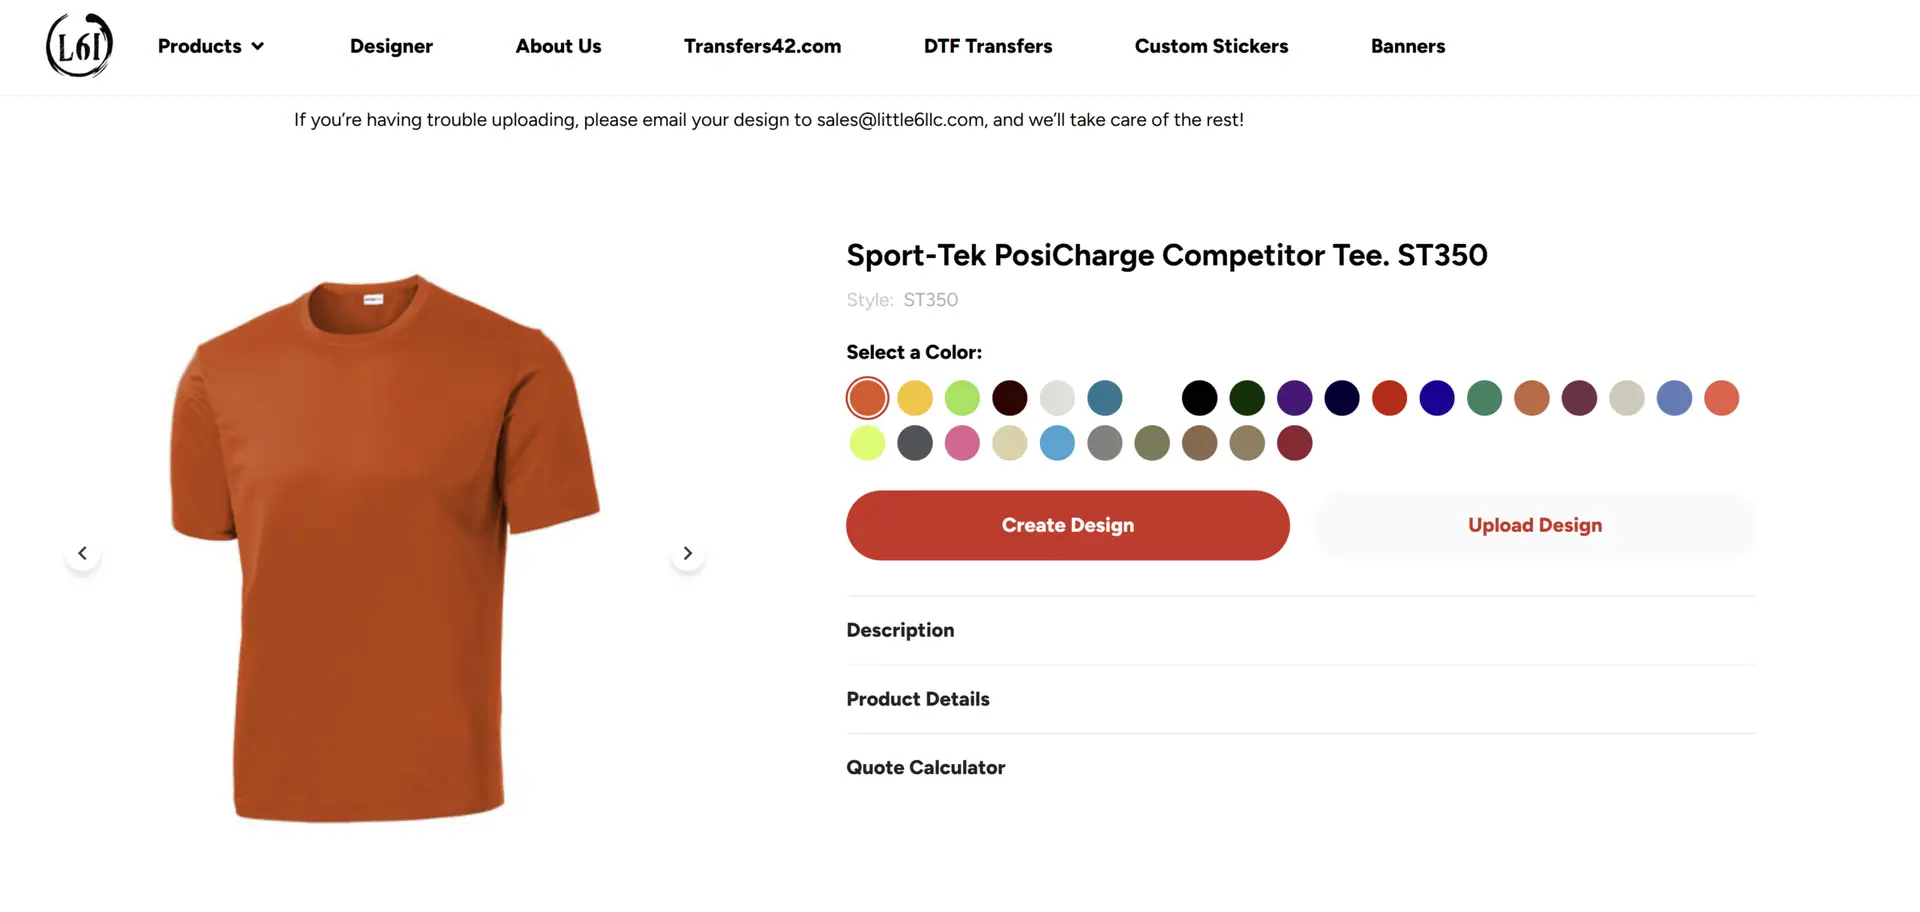
• Click “Create Design” if you want to use our online designer to add text, graphics, or clipart
• Click “Upload Design” if you already have your logo file OR if we have your artwork on file
💡 SPLIT-SCREEN TIP FOR WINDOWS USERS: Want to follow this guide while you order? Press the Windows key + Left Arrow (or Right Arrow) to snap this window to one side of your screen. Then open Little 6’s website in the other window. Now you can follow along step-by-step!
Choose your workflow below based on which button you clicked:
🎨 WORKFLOW A: “CREATE DESIGN”
For Building Designs with Our Online Designer
STEP 4A: USE THE ONLINE DESIGNER
After clicking “Create Design,” the online designer will open showing a preview of your selected shirt.
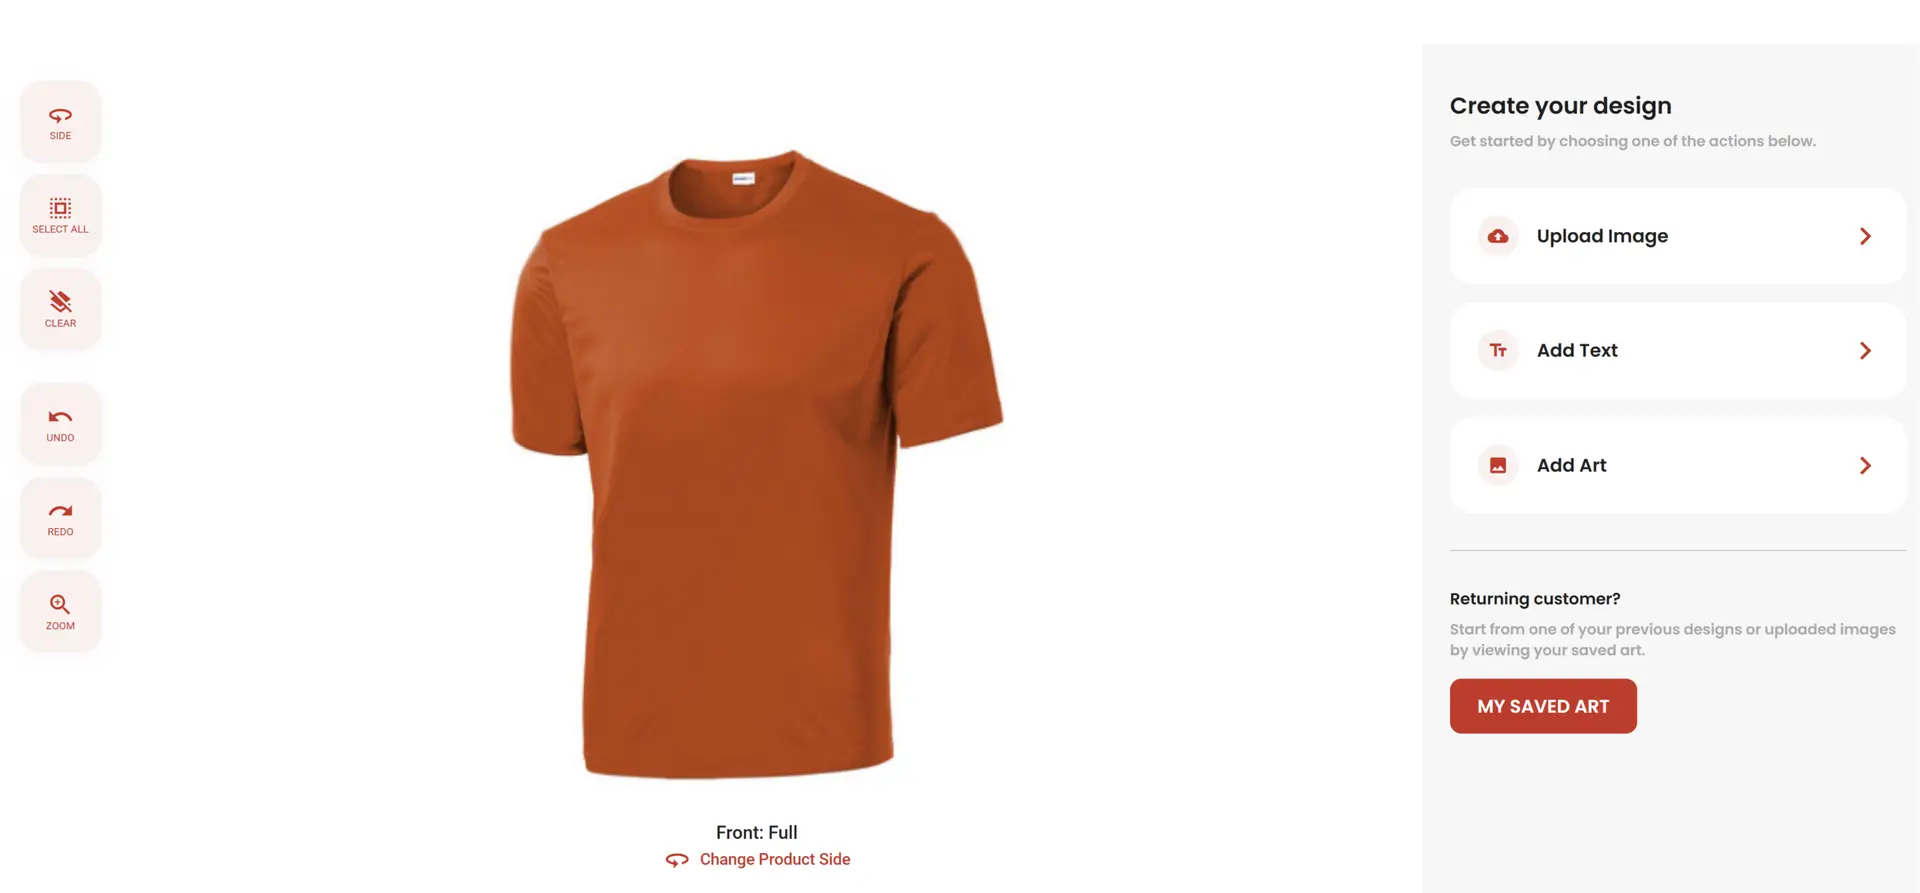
At the top, you will see “Create your design” with four options:
🔴 Upload – Click to upload your logo or image file from your computer
Tt Add Text – Click to add text with different fonts, sizes, colors, and effects
🎨 Add Art – Click to browse design templates and clipart graphics
🏷️ Product – Change shirt colors or add more products to your design
How to Add Elements:
To Upload Your Logo:
1. Click the 🔴 Upload icon
2. Select your file (PNG, JPEG, PDF accepted)
3. Your logo appears on the shirt
4. Click and drag to move it
5. Use corner handles to resize it
To Add Text:
1. Click the Tt Add Text icon
2. Type your text in the box that appears
3. Choose font, size, and color
4. Click and drag to position it on the shirt
To Add Graphics/Clipart:
1. Click the 🎨 Add Art icon
2. You will see three options:
• Browse Design Ideas: Pre-made templates you can customize
• Browse Clip Art: Individual graphics to add to your design
• My Saved Art: Your previously saved designs (requires login)
3. Click on any graphic to add it to your shirt
4. Move and resize as needed
🎨 DESIGNER TIPS:
• Layers Panel (Right Side): Shows all elements in your design – you can edit ✏️ or delete 🗑️ any layer
• Preview Different Sides: Click “Change Product Side” to switch between Front, Back, Sleeves
• Change Shirt Color: Click the Product icon to preview your design on different colored shirts
• Layer Multiple Elements: Add as many images, text, and graphics as you want!
STEP 5A: FINALIZE YOUR DESIGN AND PROCEED
Once your design looks perfect, you will proceed to select print locations and quantities. The system will guide you through choosing which sides to print on (Front, Back, Sleeves) and entering quantities for each size.
After completing your design, follow the remaining steps below to finish your order!
📤 WORKFLOW B: “UPLOAD DESIGN”
For Uploading Existing Artwork Files
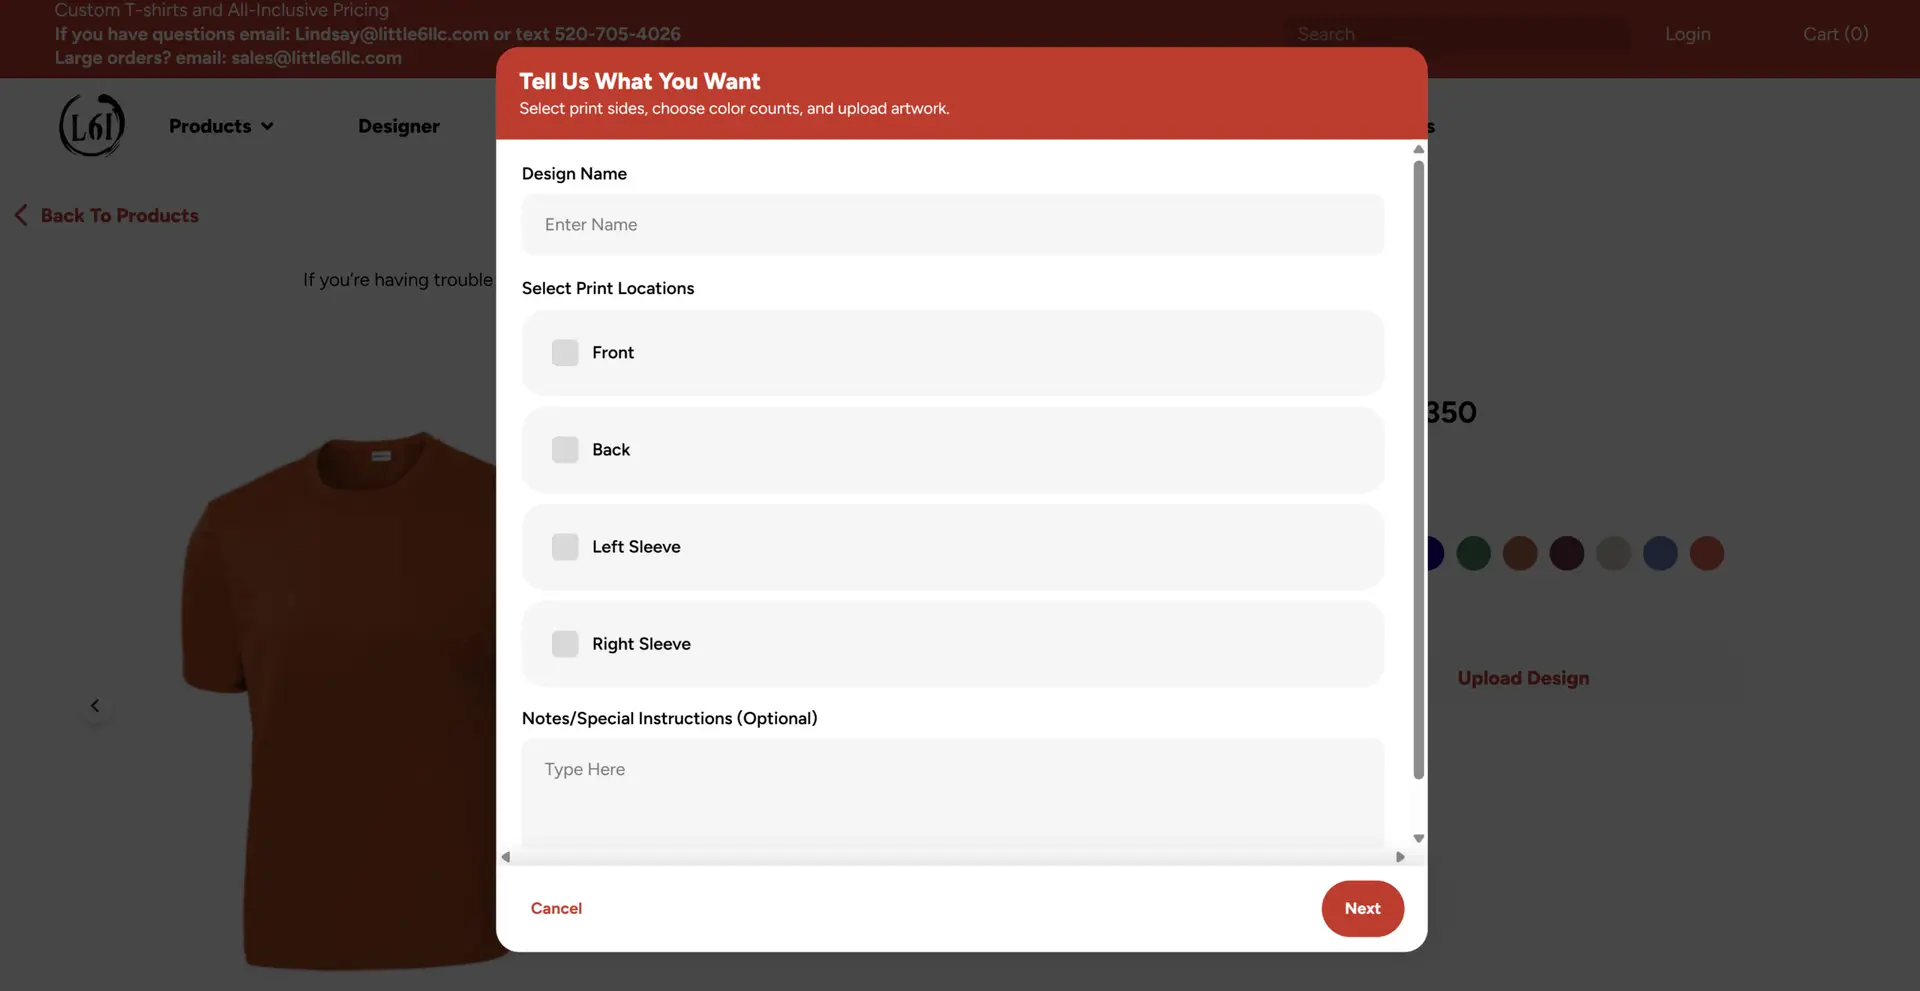
STEP 4B: NAME YOUR DESIGN (OPTIONAL)
After clicking “Upload Design,” a popup window appears titled “Tell Us What You Want” with the message “Select print sides, choose color counts, and upload artwork.”
At the top, you will see “Design Name” with a text box that says “Enter Name.”
This is optional, but it helps you find your design later if you save it. For example:
• “Team Shirts 2025”
• “Company Logo Front”
• “My Awesome Transfer!”
If you skip this, that is fine—the system will generate a name automatically.
STEP 5B: SELECT PRINT LOCATIONS
Next, you will see “Select Print Locations” with checkboxes for:
☐ Front
☐ Back
☐ Left Sleeve
☐ Right Sleeve
Click the checkbox next to each location where you want printing. When you check a box, it will turn red with a white checkmark ✓ and additional options will appear.
📍 MOST COMMON PRINT LOCATIONS:
• Front only: Logo on chest or full design across front
• Back only: Large design on back (team names, graphics)
• Front + Back: Logo on front chest, team name/number on back
• Sleeves: Small logos, numbers, or text on sleeves
💰 PRICING NOTE: Each print location you select may add to the cost. The first location is typically included in base pricing, and additional locations cost extra. The system calculates this automatically!
STEP 6B: UPLOAD YOUR ARTWORK (OR NOTE WE HAVE IT)
When you check a print location (like “Front”), you will see a red button appear that says “Upload Artwork (Optional)” and a dropdown that says “Number of Colors.”
You have THREE options:
Option 1: Upload Your Artwork File Now
If you have your logo or design file ready on your computer, click the “Upload Artwork (Optional)” button. Then select your file. Accepted formats include PNG, JPEG, PDF, AI, and EPS. For best results, use PNG files with transparent backgrounds at 300 DPI or higher.
Option 2: We Already Have Your Artwork
If we have worked together before and we already have your logo on file, skip the upload button. Instead, scroll down to the “Notes/Special Instructions (Optional)” box and write exactly which design to use. For example:
• “Use my company logo (ABC Construction)”
• “Use the design from order #12345”
• “Same design as last time – Smith Plumbing logo”
Be specific with the exact company name or reference number!
Option 3: You Will Email It Later
If you do not have the file right now, skip the upload and write in the notes: “Will email artwork to sales@little6llc.com” or “Please call me to discuss design – [your phone number].”
🎨 ABOUT “NUMBER OF COLORS”: You will see a dropdown asking how many colors are in your design. For DTF printing, this does NOT affect pricing! DTF prints in full color automatically at no extra charge, so you can select any option. This field is mainly for reference. If you are unsure, just leave it as-is or select “2 Colors” or “Full Color.”
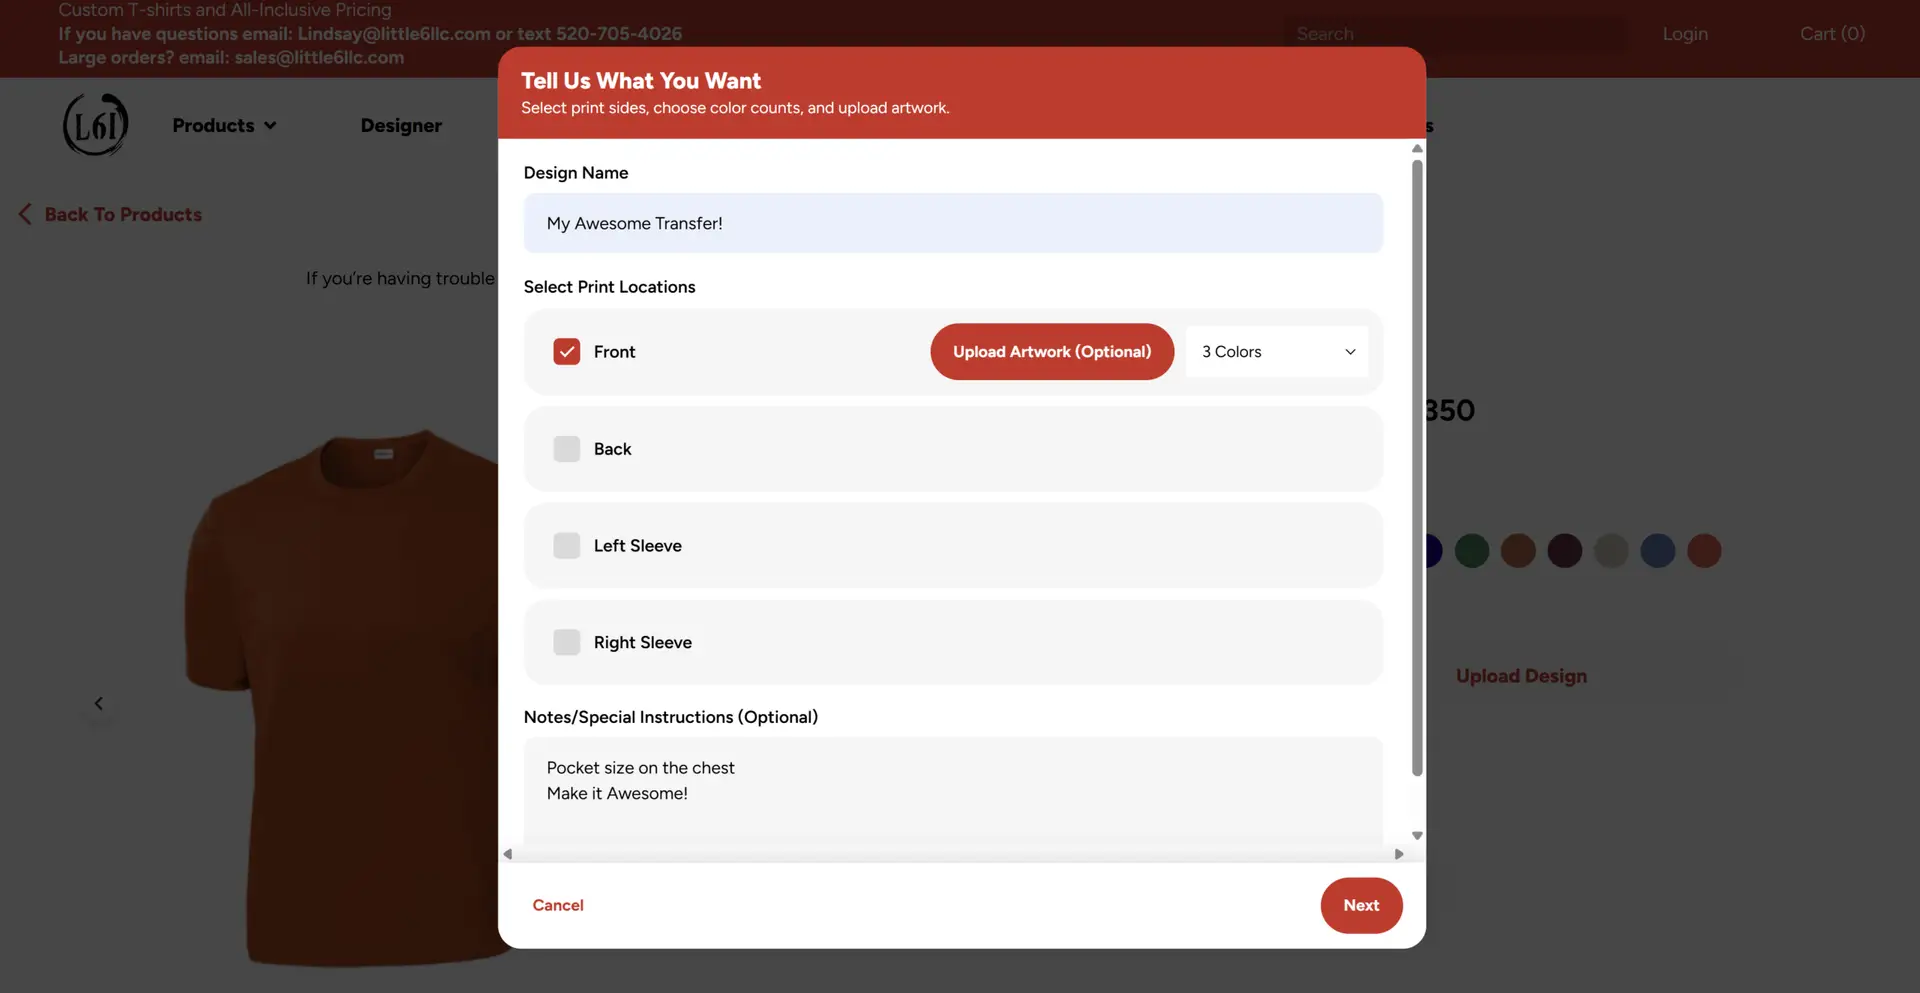
STEP 7B: ADD NOTES OR SPECIAL INSTRUCTIONS (OPTIONAL)
At the bottom of the popup, you will see “Notes/Special Instructions (Optional)” with a text box that says “Type Here.”
Use this field for any special requests or information:
• “Please use our logo on file (Smith Plumbing)”
• “Need rush service – deadline is Friday”
• “Same design as order #12345”
• “Call me before printing to confirm colors – (520) 555-1234”
• “Add individual names on back – will email list”
STEP 8B: CLICK “NEXT” TO CHOOSE SIZES
Once you have selected your print locations and either uploaded artwork OR noted we have it on file, click the red “Next” button at the bottom right of the popup.
📏 CHOOSING SIZES (BOTH WORKFLOWS)
These Steps Apply Whether You Used “Create Design” or “Upload Design”
STEP 9: ENTER QUANTITIES FOR EACH SIZE
A new screen will appear titled “Choose Sizes” showing your selected product.
You will see:
• Product image and name (for example, “Sport-Tek PosiCharge Competitor Tee, ST350”)
• Color selected (for example, “Deep Orange”)
• A grid showing ALL available sizes with quantity boxes
How to Enter Quantities:
The grid shows sizes across the top (XS, S, M, L, XL, 2XL, 3XL, 4XL) with a box under each size. Simply click in each box and type the number you need for that size.
Example:
• S: 2
• M: 5
• L: 8
• XL: 3
• 2XL: 2
• All others: 0 (or leave blank)
⚠️ IMPORTANT: Enter “0” or leave blank for sizes you do NOT need. Only fill in numbers for sizes you actually want to order! The system adds up all your quantities automatically to calculate the total number of shirts.
Need Multiple Colors?
If you need the same shirt in different colors (for example, 10 black AND 10 white), click the red “+ Add Color” button at the bottom. This will add another size grid where you can select a different color and enter quantities for that color.
STEP 10: ADD MORE COLORS IF NEEDED (OPTIONAL)
Need Multiple Colors of the Same Shirt?
If you need the same design on different colored shirts (for example, 10 black AND 10 white with the same logo), click the red “+ Add Color” button at the bottom of the size grid.
This will add another product card where you can:
1. Select a different shirt color
2. Enter quantities for each size in that color
3. The design you created/uploaded applies to all colors!
STEP 11: REVIEW YOUR CART AND CHECK OUT
Once your design is complete (or if you uploaded artwork earlier), click “Add to Cart” or “Proceed to Checkout.”
In your cart, you will see:
• All products you have added
• Quantities, sizes, and colors
• Design previews
• Pricing breakdown
• Total cost
Review everything carefully. If you need to make changes, you can edit quantities, remove items, or go back to add more products.
When everything looks good, click “Proceed to Checkout” or “Check Out.”
🛒 ORDERING MULTIPLE DESIGNS? You can add multiple products with different designs to the same cart! For example, order 20 black t-shirts with your logo AND 15 white hoodies with a different design. Simply go back and repeat the process for each product/design combination, then checkout once with everything in your cart.
STEP 12: ENTER YOUR INFORMATION
During checkout, you will need to provide:
Contact Information:
• Name
• Email address
• Phone number
Shipping or Pickup:
• For shipping: Enter your complete mailing address
• For local pickup in Maricopa: Select “Local Pickup” option (saves shipping costs!)
Special Instructions (Optional):
• Add any special notes about your order
• Specify deadline if you have one
• Request design help if needed
📍 LOCAL PICKUP ADVANTAGE: If you are in Maricopa or the surrounding area, choosing local pickup saves you $10-20 in shipping costs! Furthermore, you can often get your order faster since we do not have to wait for shipping carriers. Call us when your order is ready and swing by to pick it up!
STEP 13: SUBMIT YOUR ORDER
After entering all your information, review your order one final time. Then, click “Place Order” or “Submit Order.”
You will receive an email confirmation with:
• Order number
• Order summary
• Expected production time (typically 5-7 business days)
• Next steps
STEP 14: WE TAKE IT FROM HERE!
Once your order is submitted, our team gets to work:
1. Order Review (24 hours): We review your design files and order details
2. Design Approval (if needed): If we need clarification or if your file needs adjustment, we will email you
3. Production (5-7 business days): We print your apparel with professional quality
4. Quality Check: Every item is inspected before packaging
5. Notification: We email you when your order is ready for pickup or has shipped
⏰ TURNAROUND TIME: Standard production is 5-7 business days from the time we approve your design. However, rush service is available for urgent orders—just call us at (520) 705-4026 to discuss options and pricing!
🚀 READY TO ORDER CUSTOM APPAREL?
Browse our full catalog and start designing today!
❓ FREQUENTLY ASKED QUESTIONS
What if I do not have my logo as a digital file?
No problem! You can send us a photo of your logo, a business card, or even a sketch. Our design team can recreate it professionally. Additionally, we offer design services starting at $35 for custom artwork.
Can I order different designs on the same order?
Absolutely! Simply add each product/design combination to your cart separately. For instance, you can order t-shirts with one design and hoodies with a different design in the same checkout.
What if I need help choosing sizes?
Size charts are available on every product page. However, if you are still unsure, call us at (520) 705-4026 and we will help you determine the right sizes based on your needs. Similarly, we can provide samples if you want to see products in person before ordering large quantities.
Can I see a proof before you print?
Yes! We typically send a digital proof for approval before production begins. This ensures your design looks exactly how you want it. Moreover, if you need changes, we will revise the design until you are completely satisfied.
What forms of payment do you accept?
We accept all major credit cards, PayPal, and for established business customers, we can set up invoicing and terms.
How much does shipping cost?
Shipping costs vary based on order size and destination, typically $10-30 for most orders. However, local Maricopa customers can choose free local pickup!
What is your minimum order?
We have no minimums! Whether you need 1 shirt or 1,000 shirts, we provide the same quality and service. That said, larger quantities often qualify for volume discounts.
💡 Still Have Questions?
We are here to help! Call us at (520) 705-4026 or email sales@little6llc.com. We love walking customers through their first order and ensuring everything is perfect. No question is too small!
HELPFUL RESOURCES
• Full Apparel Catalog: Browse all available t-shirts, hoodies, polos, and more
• Brand Catalogs: View complete catalogs from Bella Canvas, Gildan, Sport-Tek, and other popular brands
• DTF Printing Guide: Learn about our printing process and how to prepare artwork
• Contact Us: Reach out with questions or for personalized assistance
About Little 6 Industries
Little 6 Industries LLC is a Service-Disabled Veteran-Owned Small Business based in Maricopa, Arizona. We specialize in custom apparel, DTF transfers, laser engraving, UV printing, custom stickers, and promotional products. With professional quality, fast turnaround, and personal service, we make custom printing easy.
“The Brand Behind the Brand”